How to use a wireless mouse on your iPhone!
Ever since iOS 13, it has been possible to connect and use both wired and wireless mouse on iPhones and iPads. Yes, that’s right. It is already possible to use the mouse on your iPhone and in this article you will find out how.
And if you’re wondering why is that, be sure that the question is valid. Even Apple hasn’t heavily publicized this new possibility, after all, the basis of Steve Jobs’ premise that the finger is the main pointing device remains.
However, accessibility, above all for people with special limitations, is the focus of this function.
And to learn how to activate this wireless mouse option on iPhone, follow the step-by-step guide below.
How to use a wireless mouse on iPhone?
First, you will need to connect the mouse to the device and you can connect it in two ways.
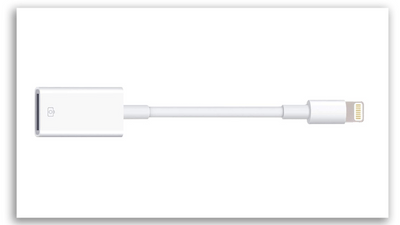
You can do this via a wired Bluetooth device using a Lightning or USB-C port. If the device is USB-A, you will need to use an adapter.
The old camera connector was used only to transfer data, but now you can use it as an adapter and connect an external HD, a flash drive, and even a mouse with the help of this dongle.

However, when connecting the adapter to your iPhone, you will still not be able to see the mouse cursor on the screen. First, you will need to activate the mouse.
See how to do this, below.
1. Activating the mouse via USB
To activate your mouse via Bluetooth, you will need to enter your iPhone settings, as follows:
- Turn on your mouse;
- Connect the adapter to the iPhone;
- Go to Settings;
- Select Accessibility;
- Scrolling down to the Physics and Motor menu and select the Touch option;
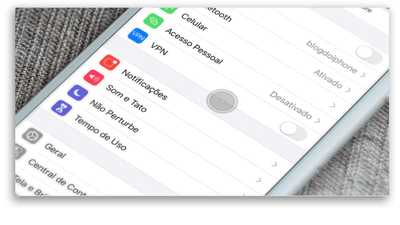
- Activate the AssistiveTouch option. When it is activated, the AssistiveTouch pointer and button will appear on your screen. However, you will not see a standard, arrow-shaped cursor. The mouse cursor is shaped like a circle to look like a touch of your fingers.
2. Activating the mouse via Bluetooth
If your device is Bluetooth, activate your mouse’s Bluetooth until it goes into connection or pairing mode.
On iPhone, go to Settings & Bluetooth, your mouse will likely appear in the list for pairing. Pair your devices and go back to iPhone Settings and repeat the above process:
- Select Accessibility
- Scrolling down to the Physics and Motor menu and select the Touch option;
- Activate the AssistiveTouch option. When it is activated, the AssistiveTouch pointer and button will appear on your screen. However, you will not see a standard, arrow-shaped cursor. The mouse cursor is shaped like a circle to look like a touch of your fingers, as shown in the image below.

TIP: First of all, if you happen to be uncomfortable with the round button on AssistiveTouch, you can adjust the opacity of the button. Just scroll down a bit on the same Activation screen as AssistiveTouch and select “Opacity when idle” and decrease it to be almost invisible.
Configuring Active Mouse
After activating the mouse in AssistiveTouch you will see the cursor ball appearing on your screen. This cursor has a default color, which can be customized, just like the mouse button functions.
To customize them and make them easier to use:
- Access the Pointing Devices menu from the same AssistiveTouch menu.
- There, by clicking on Devices, and then USB Mouse, you can configure the settings
- On the screen that appears, click each button and adjust the functions as per your needs and preferences.
By default we have:
#Button1 – refers to the left mouse button, which comes with the option of One touch, that is, as if you were touching the iPhone screen with your finger
#Button2 – corresponds to the right mouse button, set to open the AssistiveTouch menu which is convenient for home control.
#Button3 – corresponds to the middle button of your mouse and goes to the home screen of your iPhone.
Customizing your mouse
Now we move on to customizing the use of your mouse.
Cursor Style
Still in the Pointing Devices menu, in the “Cursor Style” function, you can modify the size and colors of the pointer.
Increasing the size of the pointer can be very interesting if you need more precision when making your clicks, drawings, etc. To do this, just drag the bar to the right or left and choose the ideal size for your mouse pointer.
Color
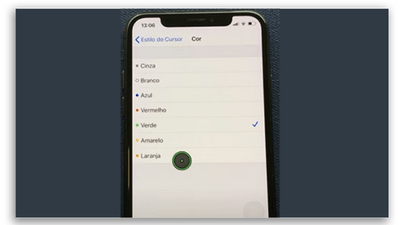
Now, about changing the pointer’s color, it is worth mentioning that what changes is the external color and the central ball of the cursor’s circle. It becomes active when you use the buttons, clicking and keeping it active.
In the Color menu, you can change the color according to your preference from grey, white, green, orange, blue, red, and yellow.

Another tweak that can be customized is setting the ability to drag items without pressing a button on the input device.
Drag Function
To activate the function select “Block Drag Action“. That way, you can hold down the input key until the item is ready to be dragged and then moved to another location without you having to keep pressing the button. When you click again, the item with the drag blocked is dropped.
Zoom
If you use Zoom with AssistiveTouch, you can change how the zoomed area responds to the cursor’s location. Just go to Settings > Accessibility > Zoom and select “Zoom Movement”. You will see these options when enabling “Zoom Motion”:
- Continuous: When zoomed in, the screen moves continuously with the cursor.
- Centered: When zoomed in, the image on the screen moves when the cursor is at or near the center of the screen.
- Edges: Similarly, when zoomed in, the screen image moves the cursor when the cursor hits an edge.
Movement
With the Wait options, you can perform cursor actions without physically pressing buttons. The Wait control has adjustments for “Motion Tolerance” and the amount of time before a select action is performed. Therefore, when Standby is enabled, the on-screen keyboard is displayed at all times.
In any case, the mouse on the iPhone works as if you were using your finger and scrolling the screen. In addition, with the screen off, you can also access your iPhone with the mouse, unlocking and accessing your information.
Ready to use a wireless mouse on your iPhone?
And even if you are not going to use this tool, knowing that the option exists, knowing that it is possible to use it this way can be useful at some point.
So share this article with anyone who might make use of it and come learn more about:


